
I have had the throttle pedal strengthened as I felt it could be a little weak when pressed, next this moved me on to a problem I'd been ignoring, the fact the movement at the pedal only opened the throttle about 65%. So I needed to come up with a multiply to make this work.I worked out I could use the chassis and a simple multiplier near the fuel tank thanks to the help of some people on a forum. This made a solution much easier
The throttle cable from the pedal came in at the low point whilst the cable to the throttle body went at the high point. the picture below shows the simple mechanism.Some parts will be replaced with more permanent parts as this was a proof of concept more then the finished article, however a throttle cable does not apply much force so doesn't need to be very beefy either.


The locking nut stops its all falling apart and the spring encourages the system back to the resting position, stopping the throttle body spring having to do all the work. Its gives a good feel to the throttle pedal and you can feel it nicely under your foot.
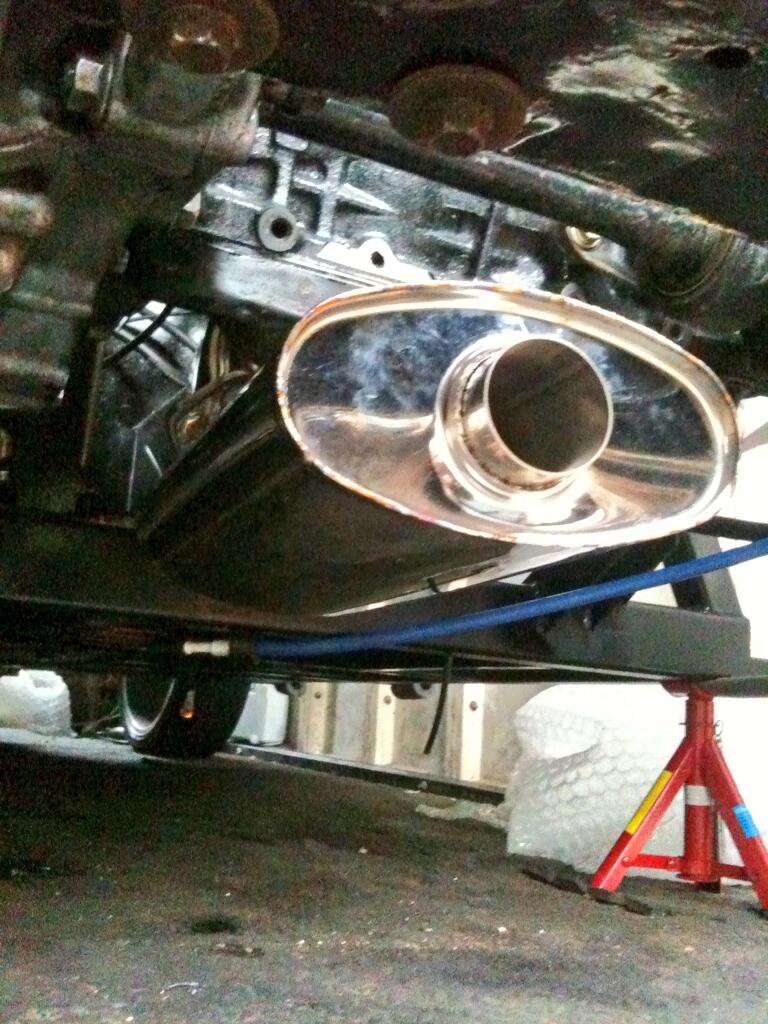
Next was the Exhaust, I was quite worried by this; the american car just had a straight through pipe so I knew I was going to have to come up with something, the first was a de-cat pipe (I don't need a Cat Test for IVA). This was a 3" pipe and id read if a system is fully 3" you can suffer from boost creep....well 3" was making everything tight anyway as I went down to 2.5" with some flexi and then fitted the silencer in the only position it could go...under the sump. It gives a lovely noise! If its not quite quiet enough ill use an exhaust bung or stick an extra small silencer in there as well. I had to get the pipe custom made and a guy came out and helped me with that and did an excellent job and at short notice. Tricket Welding
At this point I bolted in a seat yesterday and this morning decided today was the day to roll itself out the garage and it all went perfectly.
This was the first time id got to use the clutch in the position id be sat and it was 'usable'. No doubt it was heavy but usable. I do plan on letting my Girlfriend drive the car when she wants (the seat is on runners) but with this clutch I'm not sure how possible that would be other then short drives.
The clutch had plenty of spare travel so I decided I could go down a bore size, so although it would require a longer push of the pedal it would be lighter. So I set about changing the master cylinder from an 0.750 to a 0.625. this master cylinder takes 15% (or 20%) less effort, sorry I forgot what I worked it out at but takes the same extra in distance as well.
It took me around 2 hours to change the master cylinder, so it shows how much harder things get as the car is built. However it was worth it, the clutch feels much nicer and lighter and the travel worked out perfectly with the biting point half way up the pedal, unlike before. I even got my girlfriend to test it, as if it wasn't good enough I was out of ideas on making it lighter but it seemed easier to her as well.
So finally, this was me reversing the car out after changing the clutch master cylinder.The video is of poor quality and a bit short. I will do a better one soon when the weather allows.
I did do a couple more bits of wiring...but we are all sick of wiring by now...I know I am! I'm away again next weekend for another stag do! So an update will probably be lacking again I'm afraid!
No comments:
Post a Comment